Flutter Custom Paint Tutorial | Draw a Custom Shape Path in Flutter
<p class="image-align-center"><img alt="" height="599" src="http://techscript24.com/admin/UI/assets/img/BlogsImage/Screenshot 2019-01-06 at 1.02.01 AM.png" width="1000" /></p>
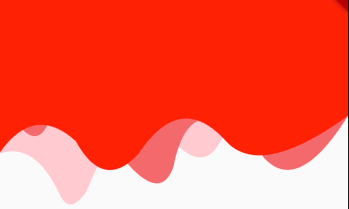
<p>Flutter is creating a Boom in the market and getting a lot of attention nowadays! Like everything related to flutter UI, drawing the custom shape on canvas is easy too.</p>
<p>We will be creating a screen similar to this…</p>
<p><img alt="" height="786" src="https://cdn-images-1.medium.com/max/800/1*houL4Gr3PMJj7hrYmrSQug.png" width="373" /></p>
<p>Throughout this tutorial, I will assume that you have a little bit of experience with flutter..though I will try to explain the basics as much as I can along the way. Let's start with the tutorial.</p>
<pre>
<code class="language-java">import 'package:flutter/material.dart';
import 'theme/colors.dart';
import 'top_bar.dart';
void main(){
runApp(MyApp());
}</code></pre>
<pre>
<code class="language-java">class MyApp extends StatelessWidget {
@override
Widget build(BuildContext context) {
return MaterialApp(
title: 'Curved Path',
theme: appTheme,
home: HomePage(),
);
}
}</code></pre>
<p>The first method that gets called is <strong>main()</strong> method and this method will call <strong>runApp(MyApp)</strong> with our root widget which returns a <strong>MaterialApp</strong>.Let's go ahead and define the HomePage widget that we have mentioned in the home property of <strong>MaterialApp</strong>.</p>
<pre>
<code class="language-java">class HomePage extends StatefulWidget {
@override
_HomePageState createState() => _HomePageState();
}
class _HomePageState extends State<HomePage> {
@override
Widget build(BuildContext context) {
return Scaffold(
body: Container(
child: TopBar(),
),
);
}
}</code></pre>
<p>Now, I have a <strong>Scaffold </strong>widget, Scaffold manages the layout of the general components of a Material design app in the flutter. I have a body with <strong>Container</strong> widget which has a child that contains the Custom Shape defined inside a separate file i.e <strong>top_bar.dart</strong>.</p>
<p>Before creating the top_bar.dart.Let's have a look into <strong>colors.dart</strong> in which app theme and some colors are defined which we are going to use inside our top_bar.dart file.</p>
<pre>
<code class="language-java">import 'dart:ui';
import 'package:flutter/material.dart';
Color colorOne = Colors.red;
Color colorTwo = Colors.red[300];
Color colorThree = Colors.red[100];
final appTheme = ThemeData(
primarySwatch: Colors.red,
);</code></pre>
<p></p>
<p>I have used three different shades of the same color so that we can have different shapes one over other with the growing intensity of color.</p>
<p>Now let's go ahead and define top_bar.dart file.</p>
<pre>
<code class="language-java">import 'package:flutter/material.dart';
import 'theme/colors.dart';
class TopBar extends StatelessWidget {
@override
Widget build(BuildContext context) {
return CustomPaint(
child: Container(
height: 300.0,
),
painter: CurvePainter(),
);
}
}</code></pre>
<p></p>
<p>I have defined the TopBar class with height 300.0, Now let's define CurvePainter class.</p>
<pre>
<code class="language-java">class CurvePainter extends CustomPainter{
@override
void paint(Canvas canvas, Size size) {
Path path = Path();
Paint paint = Paint();
path.lineTo(0, size.height *0.75);
path.quadraticBezierTo(size.width* 0.10, size.height*0.70, size.width*0.17, size.height*0.90);
path.quadraticBezierTo(size.width*0.20, size.height, size.width*0.25, size.height*0.90);
path.quadraticBezierTo(size.width*0.40, size.height*0.40, size.width*0.50, size.height*0.70);
path.quadraticBezierTo(size.width*0.60, size.height*0.85, size.width*0.65, size.height*0.65);
path.quadraticBezierTo(size.width*0.70, size.height*0.90, size.width, 0);
path.close();
paint.color = colorThree;
canvas.drawPath(path, paint);
path = Path();
path.lineTo(0, size.height*0.50);
path.quadraticBezierTo(size.width*0.10, size.height*0.80, size.width*0.15, size.height*0.60);
path.quadraticBezierTo(size.width*0.20, size.height*0.45, size.width*0.27, size.height*0.60);
path.quadraticBezierTo(size.width*0.45, size.height, size.width*0.50, size.height*0.80);
path.quadraticBezierTo(size.width*0.55, size.height*0.45, size.width*0.75, size.height*0.75);
path.quadraticBezierTo(size.width*0.85, size.height*0.93, size.width, size.height*0.60);
path.lineTo(size.width, 0);
path.close();
paint.color = colorTwo;
canvas.drawPath(path, paint);
path =Path();
path.lineTo(0, size.height*0.75);
path.quadraticBezierTo(size.width*0.10, size.height*0.55, size.width*0.22, size.height*0.70);
path.quadraticBezierTo(size.width*0.30, size.height*0.90, size.width*0.40, size.height*0.75);
path.quadraticBezierTo(size.width*0.52, size.height*0.50, size.width*0.65, size.height*0.70);
path.quadraticBezierTo(size.width*0.75, size.height*0.85, size.width, size.height*0.60);
path.lineTo(size.width, 0);
path.close();
paint.color = colorOne;
canvas.drawPath(path, paint);
}
@override
bool shouldRepaint(CustomPainter oldDelegate) {
return oldDelegate != this;
}
}</code></pre>
<p>CurvePainter class extends CustomPainter and overrides paint method and shouldRepaint method. I have drawn three paths one over other with three different colors inside the paint method.</p>
<p>Inside of paint method, we define a path and paint that will be used to draw a path on the canvas. A<strong> Path</strong> is used to define the path on which we want to draw.</p>
<p>We call the<strong> lineTo</strong> method on a path to add a straight line segment from the current point to the given point. And then adds a quadratic Bezier segment that curves from the current point to the given point (x2,y2), using the control point (x1,y1).In final path.close() is called to close that path and a new color is set on paint.</p>
<blockquote>
<p>paint.<strong>color </strong>= colorOne;<br />
canvas.drawPath(path, paint);</p>
</blockquote>
<p>At last drawPath method is called on canvas to draw the path with the coordinates we have set.</p>
<blockquote>
<p>The Path path = Path(); is created three times so that we can have three different layers of custom shapes.</p>
</blockquote>
<p>That's what we need to build this simple piece of UI, which can be used in many places!</p>
<p><strong>Youtube tutorial video link:</strong> <a href="https://youtu.be/hTxQ3uNC_oU" target="_blank">https://youtu.be/hTxQ3uNC_oU</a></p>
<p>Github repository: <a href="https://github.com/ravishankarsingh1996/custom_shape_background" target="_blank">https://github.com/ravishankarsingh1996/custom_shape_background</a></p>
<p><strong><em>If you liked what you read, please leave some claps!</em></strong></p>
<p><strong><em>Follow me:</em></strong></p>
<p>T<strong>witter :</strong> <a href="https://twitter.com/imRaviSSingh" target="_blank">https://twitter.com/imRaviSSingh</a></p>
<p>F<strong>acebook :</strong> <a href="https://www.facebook.com/itsravishankarsingh" target="_blank">https://www.facebook.com/itsravishankarsingh</a></p>
<p>I<strong>nstagram :</strong> <a href="https://www.instagram.com/itsravishankarsingh/" target="_blank">https://www.instagram.com/itsravishankarsingh/</a></p>
<p>G<strong>ithub : </strong><a href="https://github.com/ravishankarsingh1996" target="_blank">https://github.com/ravishankarsingh1996</a></p>
Published on Sun, June 2nd 2019